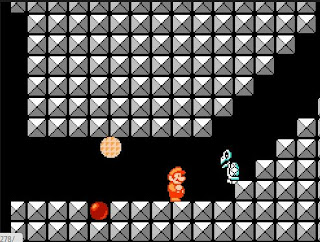
"Who is Dry Bones?" you ask. Well the older folks out there might remember Dry Bones in his original form from Super Mario 3:
That's vintage Dry Bones right there.
He's basically a skeleton Koopa Troopa
(can I just say how much I LOVED Super Mario 3, man that brings back memories)
Dry Bones has changed quite a bit over the years. This is modern day Dry Bones...driving a car.
You can see how I had my work cut out for me in trying to make a Dry Bones costume! I scoured the internet looking for some other crazy moms who attempted to make a Dry Bones costume. I found one. I actually emailed this mom who made her son a DB costume several years ago. She gave me some basic direction on how to get started and I just went with it.
What you need:
Black shirt (long sleeve)
White felt
White beanie cap (I found one at Walmart for $1.50)
Black felt
Orange Felt
White foam board
Primer Paint
Black Paint
Something to use for a shell (you'll see what I used in a minute)
Here's how you do it:
I found this printable for Skeleton Arms. I used it as my template. I cut 4 bone shapes out of white felt. These will go on the sleeves of the black shirt.
I found this printable for Skeleton Arms. I used it as my template. I cut 4 bone shapes out of white felt. These will go on the sleeves of the black shirt.
Then I cute a bunch of white strips of felt to put across (horizontally) the front of the black shirt. Now I don't sew so I bought some of that iron on "no sew" adhesive. I attempted to iron on the felt bones and strips to the black shirt...I got poor results. Not sure why it didn't stick well, but it didn't. So, I had to hand sew (no sewing machine in this house) the parts that wouldn't stick down.
I should mention that you can also add "bones" to a pair of black pants for a full outfit. I didn't do this with Caleb because I knew no one would be able to see his pants with his wheelchair costume on. Why make something that no one is going to see right?
Next I cut out 2 black felt circles and 2 smaller orange felt circles for the eyes. I sewed those to the white beanie.
For the shell I found a Captain America shield at Party City. I found the last shield in stock. The price: $15!! How these people can charge $15 for a round piece of plastic is beyond me. Anyway, it was my lucky day because the straps on the back of the shield were broken. So I did a little wheelin' and dealin' with the manager and got the shield for half price. I still think $7.50 is ridiculous for something that probably cost 4 cents to make but I had to have something.
I took Captain America's shield home and gave it a makeover:
I primed it and then painted it black.
Next, I cut out a bunch of hexagon shapes from white foam board and glued them all over the black shell.
And that is how you make a Dry Bones costume! Hopefully this post will help some poor mom years from now who has a kid that wants to be Dry Bones for Halloween. Your welcome.
Now for the wheelchair part of the costume.
What you need:
Cardboard, lots of it
Spray Paint (we stuck with black and white)
Hot glue gun
Whatever decorations you want to add.
I'm not going to give step by step instructions on how I made the wheelchair part of the costume. There really isn't a rhyme or reason to the madness. Glenn just brings home a giant cardboard box, I cut it up and then just play around with the pieces until they resemble a car.
This is what my living room looked like last Friday night.
Somehow I turned all that cardboard into this:
I used black and white checkered Duck Tape for the stripes.
I used Glow-n-the-dark Duck Tape for the Dry Bones emblem (I cut it out with an exacto knife)
I got a styrofoam cone and painted it silver, added red tissue paper for fun.
If you are familiar with Mari Kart you know you get items (shells, banana peels, stars, etc). I printed the star out and added it to the back of the car. I thought it added a nice touch.
At the last minute I decided to do something with the wheels. I bought black poster board, cut big circles to fit on the hand rims and I added more bone shapes (cut from white paper) as the wheel spokes.
And there you have it. It looks hard and time consuming but it really wasn't.
I'm kinda proud of it. This may be my favorite wheelchair costume yet.


No comments:
Post a Comment