
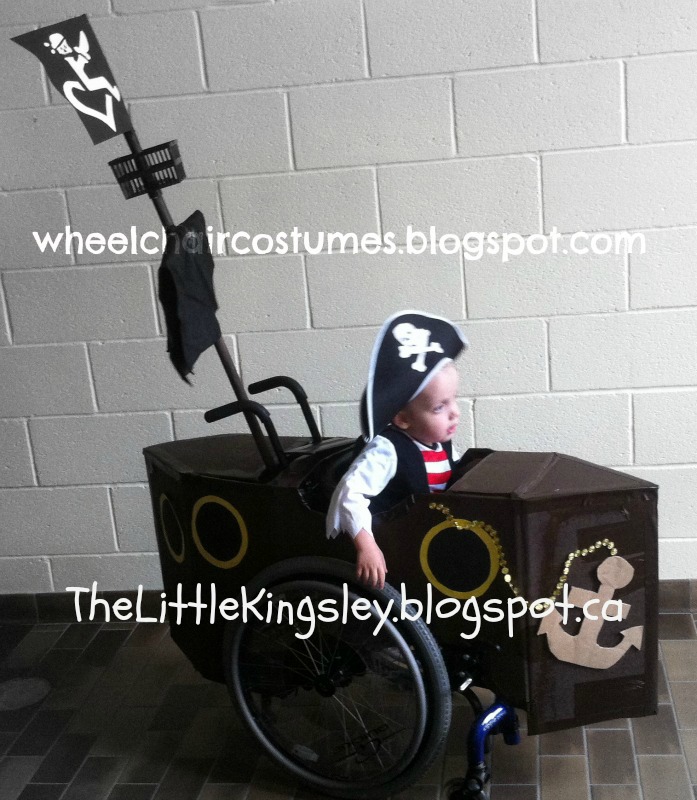
This was my first attempt at a wheelchair costume. You could describe this as a crafty creation for the extremely uncrafty. Very low difficulty!
You Need:
a big box that will fit over the wheelchair and extends out in the front and back
exacto knife or awesome scissors
black duct tape (or a hot glue gun)
a thin and a thicker dowel (round pieces of wood)
black cloth
brown spray paint
black and yellow construction paper
berry basket or other plastic container
zip ties and/or plastic bottle
drop cloth (to paint on)
pirate costume
parrot, chains, etc (optional)


2. Tape the side flaps on the end of the box so that they form a point in the front and back. Trim the top flap to make a triangle and tape it to the point.
*I had to trim the length of my box first. I wanted it the length of my van trunk so that it would travel easily.
3. Put the box on the wheelchair, go underneath and draw where the handle bars and seat are or whatever you want cut off the top. Cut that out. We made two holes - one for the handles and one for Kingsley to go in and out without having to take off the costume. Making two holes instead of one big one allowed it to rest on the back of his seat for more support.
4. Trim the bottom to fit over the chair. We trimmed around the wheels, the brakes, and the foot rest so that the box rested on these things and didn't need to be strapped on to the chair at all. It was a lot of random trimming and guessing.
5. Put your kid in and see if they can reach the wheels. If not, trim the sides so they don't get underarm chaffing. Make sure you can do up the seat belt, brake the brakes, push from the side and whatever else is important for you. Trim as needed.
6. Tape all the edges if you are a lousy cutter and it's all jagged and uneven... which mine was. I also added tape inside to reinforce where the sides of the chair rubbed the inside of the box.

8. Cut a hole in the bottom of the basket so that it can slide onto the thicker dowel. Decide where you want the crow's nest (the basket)... probably somewhere above the bandanna/thin dowel. Tape a ring below to keep it from sliding.
9. Go outside or in an open garage, put down the drop cloth, spray paint the mast (the dowel creation) and the big box ship.


10. While everything is drying, have a cup of tea. You've been working hard.
11. Get your black construction paper and cut out some big circles. Get the yellow and cut slightly bigger circles or rings.
12. Google "Jolly Roger" and print out a flag or free hand draw if you're a rockstar.
13. Dig up some of those cardboard box scraps and cut out an anchor. You might want to google so you can remember what they look like.
14. If you have time, you can do another coat of spray paint on the box. If you've maxed out your craftiness at this point, no worries, everyone will be so amazed that you made it this far, they won't even notice.
15. Raid your kids craft bin and find some glue or just use that tape you still have to add the portholes (those circles you cut out) and the anchor to the side of your ship (put it on the wheelchair first so you don't add them to where the wheel is), and the flag to the top of the mast.
16. If the costume is going to be a one-shot deal, zip tie the mast to the back of the chair and you are all set. If you'll be transporting it and need to remove the mast to fit in your vehicle, get a waterbottle, wedge and/or zip tie it behind the chair. Drop the mast into the bottle. Remove as needed.
17. Teach your kid to yell AARGH!
18. Break open the Halloween candy and indulge. Well done.

Thank you Jill from "The Little King" for sharing this arrrgghhsome costume!
No comments:
Post a Comment